Z SCORE TABLE
  • Z Table
    • Z Scores to Percentiles Chart
    • Z Score Calculator
    • Z Score Probability Calculator
    • Interactive Z Table
    • Z Score Formula
    • How to calculate the z score
    • How To Use Z-Score Table
    • Calculate Z-score
    • Probability in Statistics
    • Parameters in Statistics
    • Percentile Rank
    • Z Score Chart Basics
    • History of Normal Distirbution
    • Statistics Z Score Jokes
    • When to Use Z Test vs T Test
    • Z Score Practice Problems
    • Z Score Problems
    • Normal Distribution Problems
    • Confidence Interval Calculator >
      • Confidence Interval in Excel
      • 90 confidence interval z score
      • 95 Confidence Interval Z Score
      • 99 Confidence Interval Z Score
    • Z Score Confidence Interval
  • Statistics
    • Statistics Symbols
    • Statistics Formulas >
      • Binomial Coefficient
      • Empirical Rule
      • Correlation Coefficient
    • P Value Calculator >
      • P Value Calculator from Z Score
      • P Value Calculator from T Score
      • P Value Calculator from Chi-Square
      • P Value Calculator from F Ratio (ANOVA)
      • P Value Calculator from Pearson R
      • P Value Calculator Tukey's Q Score
    • Cumulative Binomial Probability Calculator
    • Normal CDF Calculator >
      • Normal CDF Formula
      • Non-normal Distribution
      • How to find normal cdf ti 84
      • Examples of Standard Deviation
      • Sample Standard Deviation on Calculator
      • Standard Deviation vs Variance
      • Population vs. Sample
      • Quantitative vs. Qualitative Data
      • Formula of Standard Deviation for Grouped Data
      • Null Hypothesis vs. Alternative Hypothesis
      • Discrete vs. Continuous Data
      • Mean vs. Median vs. Mode
      • Bayesian vs. Frequentist Statistics
      • What is High Standard Deviation
      • What Does a Standard Deviation of 0 Mean
      • Observational Study vs. Experimental Study
      • Parametric vs. Non-parametric tests
      • What is 1 Standard Deviation Above the Mean
      • How to find correlation coefficient on ti 84
      • How to find linear regression on ti-84
      • How to find solving equations on ti-84
      • How to find quadratic regression on ti-84
      • How to find factorial on ti-84
      • How to find integrals on ti-84
      • How to find confidence intervals on ti-84
      • How to find z-score on ti-84
      • How to find derivatives on ti-84
      • How to find summation on ti-84
      • How to find anova on ti-84
      • How to find graphing functions on ti-84
      • How to find factorial on ti-89
      • How to find integrals on ti-89
      • How to find standard deviation on ti-89
      • How to find derivatives on ti-89
      • How to find linear regression on ti-89
      • How to find matrix operations on ti-89
      • How to find summation on ti-89
      • How to find variance on ti-89
      • How to find Correlation on TI-Nspire
      • How to find Variance on TI-Nspire
      • How to find Standard Deviation on TI-Nspire
      • What Does a Standard Deviation of 2 Mean
      • How to find Linear Regression on TI-Nspire
      • How to find Quadratic Regression on TI-Nspire
      • How to find Matrix Operations on TI-Nspire
      • How to find Solving Equations on TI-Nspire
      • How to find Graphing Functions on TI-Nspire
      • How to find Integrals on TI-Nspire
      • How to find Derivatives on TI-Nspire
      • How to find Summation on TI-Nspire
      • How to find Factorial on TI-Nspire
      • How to find Combinations and Permutations on TI-Nspire
      • How to find Z-Score on TI-Nspire
      • How to find Probability Distributions on TI-Nspire
      • How to find ANOVA on TI-Nspire
      • How to find Histograms on TI-Nspire
      • How to find Box-and-Whisker Plots on TI-Nspire
      • How to find Present and Future Value on TI-Nspire
      • How to find Confidence Intervals on TI-Nspire
      • Population Standard Deviation and Sample Standard Deviation
    • Correlation Calculator >
      • Covariance vs. Correlation
    • Dice Roller
    • Probability Distribution Calculator
    • Interquartile Range Calculator
    • Empirical Rule Calculator
    • Mean, Median and Mode Calculator
    • Average Calculator
    • Linear Regression Calculator
    • Sample Size Calculator
    • Other Statistical Tables >
      • T Value Table
      • Chi-Square Table
      • F Distribution Table
    • Standard Deviation Calculator
    • Standard Deviation Problems
    • Normal vs Non-Normal Distribution: Understanding the Differences
    • Covariance vs. Variance: Understanding the Differences
    • Explanatory Variable: Understanding Its Role in Statistical Analysis
    • Independent variable vs dependent
    • What is a Residual in Statistics?
    • Left Skewed vs. Right Skewed Distributions
    • How to Find Variance on ti 84
    • Real Life Examples of Correlation
    • What is Regression Analysis?
    • Statistics Forum
  • Math
    • Combination Calculator
    • How to Calculate a Combination
    • Combination Formula in Statistics
    • Permutation Calculator
    • Distance Between Two Points Calculator
    • Exploring 7 Unsolvable Math Problems >
      • Riemann Hypothesis
    • Math Problems >
      • Math Problems for 1st Graders
      • Math Problems for 2nd Graders
      • Math Problems for 3rd Graders
      • Math Problems for 4th Graders
      • Math Problems for 5th Graders
      • Math Problems for 6th Graders
      • Math Problems for 7th Graders
      • Math Problems for 8th Graders
      • Math Problems for 9th Graders
      • Math Problems for 10th Graders
      • Math Problems for 11th Graders
    • Times Tables >
      • 1 Times Table
      • 2 Times Table
      • 3 Times Table
      • 4 Times Table
      • 5 Times Table
      • 6 Times Table
      • 7 Times Table
      • 8 Times Table
      • 9 Times Table
      • 10 Times Table
    • Multiplication Tables >
      • Multiplication Table by 20
      • Multiplication Table by 19
      • Multiplication Table by 18
      • Multiplication Table by 17
      • Multiplication Table by 16
      • Multiplication Table by 15
      • Multiplication Table by 14
      • Multiplication Table by 13
      • Multiplication Table by 12
      • Multiplication Table by 11
      • Multiplication Table by 10
      • Multiplication Table by 9
      • Multiplication Table by 8
      • Multiplication Table by 7
      • Multiplication Table by 6
      • Multiplication Table by 5
      • Multiplication Table by 4
      • Multiplication Table by 3
    • Roman Numerals Chart
    • Roman Numerals >
      • Roman Numerals Converter
      • I Roman Numerals
      • II Roman Numerals
      • III Roman Numerals
      • IV Roman Numerals
      • V Roman Numerals
      • VI Roman Numerals
      • VII Roman Numerals
      • VIII Roman Numerals
      • IX Roman Numerals
      • X Roman Numerals
      • XI Roman Numerals
      • XII Roman Numerals
      • XIII Roman Numerals
      • XIV Roman Numerals
      • XV Roman Numerals
      • XVI Roman Numerals
      • XVII Roman Numerals
      • XVIII Roman Numerals
      • LXVI Roman Numerals
      • LXVII Roman Numerals
      • LXVIII Roman Numerals
      • LXIX Roman Numerals
      • LXX Roman Numerals
      • LXXI Roman Numerals
      • LXXII Roman Numerals
      • LXXIII Roman Numerals
      • LXXIV Roman Numerals
      • LXXV Roman Numerals
      • LXXVI Roman Numerals
      • LXXVII Roman Numerals
      • LXXVIII Roman Numerals
      • LXXIX Roman Numerals
      • LXXX Roman Numerals
      • LXXXI Roman Numerals
      • LXXXII Roman Numerals
      • LXXXIII Roman Numerals
      • LXXXIV Roman Numerals
      • LXXXV Roman Numerals
      • LXXXVI Roman Numerals
      • LXXXVII Roman Numerals
      • LXXXVIII Roman Numerals
      • LXXXIX Roman Numerals
      • XC Roman Numerals
      • XCI Roman Numerals
      • XCII Roman Numerals
      • XCIII Roman Numerals
      • XCIV Roman Numerals
      • XCV Roman Numerals
      • XCVI Roman Numerals
      • XCVII Roman Numerals
      • XCVIII Roman Numerals
      • XCIX Roman Numerals
      • C Roman Numerals
      • CI Roman Numerals
      • CII Roman Numerals
      • CIII Roman Numerals
      • CIV Roman Numerals
      • CV Roman Numerals
      • CVI Roman Numerals
      • CVII Roman Numerals
      • CVIII Roman Numerals
      • CIX Roman Numerals
      • CX Roman Numerals
      • CXI Roman Numerals
      • CXII Roman Numerals
      • CXIII Roman Numerals
      • CXIV Roman Numerals
      • CXV Roman Numerals
      • CXVI Roman Numerals
      • CXVII Roman Numerals
      • CXVIII Roman Numerals
      • CXIX Roman Numerals
      • CXX Roman Numerals
      • CXXI Roman Numerals
      • CXXII Roman Numerals
      • CXXIII Roman Numerals
      • CXXIV Roman Numerals
      • CXXV Roman Numerals
      • CXXVI Roman Numerals
      • CXXVII Roman Numerals
      • CXXVIII Roman Numerals
      • CXXIX Roman Numerals
      • CXXX Roman Numerals
      • CXXXI Roman Numerals
      • CXXXII Roman Numerals
      • CXXXIII Roman Numerals
      • CXXXIV Roman Numerals
      • CXXXV Roman Numerals
      • CXXXVI Roman Numerals
      • CXXXVII Roman Numerals
      • CXXXVIII Roman Numerals
      • CXXXIX Roman Numerals
      • CXL Roman Numerals
      • CXLI Roman Numerals
      • CXLII Roman Numerals
      • CXLIII Roman Numerals
      • CXLIV Roman Numerals
      • CXLV Roman Numerals
      • CXLVI Roman Numerals
      • CXLVII Roman Numerals
      • CXLVIII Roman Numerals
      • CXLIX Roman Numerals
      • CL Roman Numerals
      • CLI Roman Numerals
      • CLII Roman Numerals
      • CLIII Roman Numerals
      • CLIV Roman Numerals
      • CLV Roman Numerals
      • CLVI Roman Numerals
      • CLVII Roman Numerals
      • CLVIII Roman Numerals
      • CLIX Roman Numerals
      • CLX Roman Numerals
      • CLXI Roman Numerals
      • CLXII Roman Numerals
      • CLXIII Roman Numerals
      • CLXIV Roman Numerals
      • CLXV Roman Numerals
      • CLXVI Roman Numerals
      • CLXVII Roman Numerals
      • CLXVIII Roman Numerals
      • CLXIX Roman Numerals
      • CLXX Roman Numerals
      • CLXXI Roman Numerals
      • CLXXII Roman Numerals
      • CLXXIII Roman Numerals
      • CLXXIV Roman Numerals
      • CLXXV Roman Numerals
      • CLXXVI Roman Numerals
      • CLXXVII Roman Numerals
      • CLXXVIII Roman Numerals
      • CLXXIX Roman Numerals
      • CLXXX Roman Numerals
      • CLXXXI Roman Numerals
      • CLXXXII Roman Numerals
      • CLXXXIII Roman Numerals
      • CLXXXIV Roman Numerals
      • CLXXXV Roman Numerals
      • CLXXXVI Roman Numerals
      • CLXXXVII Roman Numerals
      • CLXXXVIII Roman Numerals
      • CLXXXIX Roman Numerals
      • CXC Roman Numerals
      • CXCI Roman Numerals
      • CXCII Roman Numerals
      • CXCIII Roman Numerals
      • CXCIV Roman Numerals
      • CXCV Roman Numerals
      • CXCVI Roman Numerals
      • CXCVII Roman Numerals
      • CXCVIII Roman Numerals
      • CXCIX in Roman Numerals
      • CC Roman Numerals
      • 3 in Roman Numerals
      • 4 in Roman Numerals
      • 5 in Roman Numerals
      • 6 in Roman Numerals
      • 7 in Roman Numerals
      • 8 in Roman Numerals
      • 9 in Roman Numerals
      • 10 in Roman Numerals
      • 11 in Roman Numerals
      • 12 in Roman Numerals
      • 13 in Roman Numerals
      • 14 in Roman Numerals
      • 15 in Roman Numerals
      • 16 in Roman Numerals
      • 18 in Roman Numerals
      • 19 in Roman Numerals
      • 20 in Roman Numerals
      • 22 in Roman Numerals
      • 30 in Roman Numerals
      • 50 in Roman Numerals
      • 100 in Roman Numerals
      • 500 in Roman Numerals
      • 1000 in Roman Numerals
      • SAMPLE >
        • TEMP XVII Roman Numerals
    • Percentage Increase Calculator
    • Linear Equations >
      • Two-Variable Linear Equations Test with Answers
      • One Variable Linear Equations >
        • Ax=B Linear Equation Calculator
        • Ax=B Linear Equation Practice Test
    • Decimal Places Value Chart
    • Cone Volume Calculator
    • Circumference Calculator
    • Rounding Calculator >
      • Round 15 to the nearest ten
      • Round 75 to the nearest ten
      • Round 35 to the nearest ten
      • Round 5 to the nearest ten
      • Round 3 to the Nearest Ten
    • Factor Calculator >
      • Factor of 36
      • Factor of 30
      • Factor of 32
      • Factor of 35
      • Factor of 39
      • Factor of 33
      • Factor of 34
      • Factor of 3
      • Factor of 3/4
      • Factor of 38
    • Radius of a Circle
    • Fraction Calculator
    • Perfect Square Calculator >
      • Is 1 a perfect square
      • Is 2 a perfect square
      • Is 8 a perfect square
      • Is 9 a perfect square
      • Is 16 a perfect square
      • Is 20 a perfect square
      • Is 36 a perfect square
      • Is 49 a perfect square
      • Is 81 a perfect square
      • Is 125 a perfect square
    • Random Number Generator >
      • Random and Pseudorandom Numbers
      • What is Random Number
    • Horizontal Line
    • X and Y Axis
    • Margin Calculator
    • Simple Interest Calculator
    • Sig Fig Calculator
    • Right Triangle Calculator
    • Money Counter
    • Root Calculator
    • Table of Square Roots
    • Square Root Calculator >
      • Square root of 2
      • Square root of 8
      • Square root of 5
      • Square root of 4
      • Square root of 3
      • Square root of 64
      • Square root of 10
      • Square root of 16
      • Square root of 25
      • Square root of 12
      • Square root of 50
      • Square root of 20
      • Square root of 9
      • Square root of 100
      • Square root of 36
      • Square root of 6
      • Square root of 49
      • Square root of 1
      • Square root of 32
      • Square root of 40
      • Square root of 81
      • Square root of 18
      • Square root of 72
      • Square root of 13
      • Square root of 80
      • Square root of 45
    • Log Calculator
    • Inequality Symbols
    • Exponent calculator
    • Decimal to Fraction Calculator
    • Fraction to Percent Calculator
    • Scale Factor
  • Unit Conversion
    • Celsius to Fahrenheit Converter >
      • -40 C to F
      • 10 C to F
      • 15 C to F
      • 22 C to F
      • 30 C to F
      • 37 C to F
      • 40 C to F
    • Fahrenheit to Celsius Converter >
      • -40 F to C
      • 17 Fahrenheit to Celsius
      • 18 Fahrenheit to Celsius
      • 19 Fahrenheit to Celsius
      • 20 Fahrenheit to Celsius
      • 23 Fahrenheit to Celsius
      • 26 Fahrenheit to Celsius
      • 27 Fahrenheit to Celsius
      • 28 Fahrenheit to Celsius
      • 37 Fahrenheit to Celsius
      • 40 F to C
      • 60 F to C
      • 68 F to C
      • 69 F to C
      • 70 F to C
      • 72 F to C
      • 75 F to C
      • 80 F to C
      • 90 F to C
      • 100 F to C
      • 180 F to C
      • 220 F to C
      • 350 F to C
    • Weight conversion table kg to lbs
    • Kilograms to Pounds Converter >
      • 1 kg to lbs
      • 2 kg to lbs
      • 3 kg to lbs
      • 4 kg to lbs
      • 6 kg to lbs
      • 8 kg to lbs
      • 10 kg to lbs
      • 12 kg to lbs
      • 15 kg to lbs
      • 16 kg to lbs
      • 20 kg to lbs
      • 23 kg to lbs
      • 25 kg to lbs
      • 30 kg to lbs
      • 40 kg to lbs
      • 45 kg to lbs
      • 50 kg to lbs
      • 53 kg to lbs
      • 56 kg to lbs
      • 57 kg to lbs
      • 58 kg to lbs
      • 59 kg to lbs
      • 60 kg to lb
      • 62 kg to lbs
      • 63 kg to lbs
      • 64 kg to lbs
      • 65 kg to lbs
      • 67 kg to lbs
      • 68 kg to lbs
      • 70 kg to lbs
      • 72 kg to lbs
      • 73 kg to lbs
      • 74 kg to lbs
      • 75 kg to lbs
      • 76 kg to lbs
      • 78 kg to lbs
      • 80 kg to lbs
      • 82 kg to lbs
      • 84 kg to lbs
      • 85 kg to lbs
      • 90 kg to lbs
      • 95 kg to lbs
      • 150 kg to lbs
      • 100 kg to lbs
    • Pounds to Kilograms Converter >
      • 1-10 LB to KG >
        • 1.25 lb to kg
        • 2.25 lb to kg
        • 3.75 lb to kg
        • 1.75 lb to kg
        • 1.56 lb to kg
        • 5.25 lb to kg
        • 2.75 lb to kg
        • 1.87 lb to kg
        • 1.65 lb to kg
        • 2.87 lb to kg
        • 0.75 lb to kg
        • 0.75 lb to kg
        • 1.1 lb to kg
        • 1.21 lb to kg
        • 1.32 lb to kg
        • 3.25 lb to kg
        • 1.55 lb to kg
        • 2.65 lb to kg
        • 1.37 lb to kg
        • 0.55 lb to kg
        • 1.85 lb to kg
        • 2.15 lb to kg
        • 1.14 lb to kg
        • 3.31 lb to kg
        • 0.88 lb to kg
        • 1.15 lb to kg
        • 5.29 lb to kg
        • 0.45 lb to kg
        • 4.75 lb to kg
        • 0.85 lb to kg
        • 0.95 lb to kg
        • 5.11 lb to kg
        • 0.44 lb to kg
        • 1.82 lb to kg
        • 2.85 lb to kg
        • 0.68 lb to kg
        • 1.13 lb to kg
        • 0.05 lb to kg
        • 2.47 lb to kg
        • 3.85 lb to kg
        • 4.23 lb to kg
        • 1.38 lb to kg
        • 2.91 lb to kg
        • 4.12 lb to kg
        • 2.95 lb to kg
        • 5.73 lb to kg
        • 2.99 lb to kg
        • 1.78 lb to kg
        • 3.35 lb to kg
        • 1.92 lb to kg
        • 1.58 lb to kg
        • 5.51 lb to kg
        • 1.28 lb to kg
        • 0.02 lb to kg
        • 1.42 lb to kg
        • 0.89 lb to kg
        • 1.16 lb to kg
        • 1.99 lb to kg
        • 1.69 lb to kg
        • 2.17 lb to kg
        • 1 lb to kg
        • 1.6 lb to kg
        • 2 lb to kg
        • 3 lb to kg
        • 4 lb to kg
        • 5 lb to kg
        • 6 lb to kg
        • 7 lb to kg
        • 8 lb to kg
        • 9 lb to kg
        • 10 lb to kg
      • 11 lb to kg
      • 12 lb to kg
      • 12.5 lb to kg
      • 13 lb to kg
      • 14 lb to kg
      • 15 lb to kg
      • 16 lb to kg
      • 17 lb to kg
      • 18 lb to kg
      • 19 lb to kg
      • 20 lb to kg
      • 21 lb to kg
      • 22 lb to kg
      • 23 lb to kg
      • 24 lb to kg
      • 25 lb to kg
      • 26 lb to kg
      • 27 lb to kg
      • 28 lb to kg
      • 29 lb to kg
      • 30 lb to kg
      • 31 lb to kg
      • 32 lb to kg
      • 33 lb to kg
      • 35 lb to kg
      • 40 lb to kg
      • 45 lb to kg
      • 50 lb to kg
      • 55 lb to kg
      • 60 lb to kg
      • 70 lb to kg
      • 90 lb to kg
      • 98 lb to kg
      • 99 lb to kg
      • 100 lb to kg
      • 130 lb to kg
      • 150 lb to kg
    • Fluid Ounces to Milliliters
    • Kilometers to Miles Converter >
      • 1 kilometer to miles
      • 5 km to miles
      • 10 km to miles
      • 15 km to miles
      • 20 km to miles
      • 50 km to miles
      • 100 km to miles
    • Miles to Kilometers Conversion >
      • 1 mile to kilometers
      • 5 miles to km
      • 10 miles to km
      • 15 miles to km
      • 20 miles to km
    • KPH to MPH Converter >
      • 30 kph to mph
      • 45 kph to mph
      • 60 kph to mph
      • 70 kph to mph
      • 75 kph to mph
      • 90 kph to mph
      • 100 kph to mph
      • 110 kph to mph
      • 120 kph to mph
      • 130 kph to mph
      • 140 kph to mph
      • 150 kph to mph
      • 155 kph to mph
      • 160 kph to mph
      • 165 kph to mph
      • 180 kph to mph
      • 200 kph to mph
      • 210 kph to mph
      • 220 kph to mph
      • 240 kph to mph
      • 250 kph to mph
      • 260 kph to mph
      • 270 kph to mph
      • 280 kph to mph
      • 300 kph to mph
      • 320 kph to mph
      • 360 kph to mph
      • 400 kph to mph
      • 600 kph to mph
      • 800 kph to mph
    • Inches to Millimeters Converter >
      • 1 inch to mm
      • 1.5 inches to mm
      • 2 inches to mm
      • 2.5 inches to mm
      • 3 inches to mm
      • 4 inches to mm
      • 5 inches to mm
      • 6 inches to mm
      • 18 inches to mm
      • 34 inches to mm
      • 160 inches to mm
    • Millimeters to Inches Converter >
      • 1 mm to inches
      • 1.5 mm to inches
      • 2 mm to inches
      • 2.5 mm to inches
      • 3 mm to inches
      • 3.5 mm to inches
      • 4 mm to inches
      • 4.5 mm to inches
      • 5 mm to inches
      • 6 mm to inches
      • 8 mm to inches
      • 10 mm to inches
    • Meters to Feet Converter >
      • 1 Meter to Feet
      • 2 Meters to Feet
      • 3 Meters to Feet
      • 5 Meters to Feet
      • 10 Meters to Feet
      • 20 Meters to Feet
      • 30 Meters to Feet
      • 50 Meters to Feet
      • 100 Meters to Feet
    • Centimeters to Inches Converter >
      • 2 cm to inches
      • 3 cm to inches
      • 5 cm to inches
      • 8 cm to inches
      • 10 cm to inches
      • 12 cm to inches
      • 14 cm to inches
      • 15 cm to inches
      • 17 cm to inches
      • 18 cm to inches
      • 20 cm to inches
      • 21 cm to inches
      • 25 cm to inches
      • 28 cm to inches
      • 30 cm to inches
      • 35 cm to inches
      • 40 cm to inches
      • 50 cm to inches
      • 60 cm to inches
      • 36 cm to inches
      • 45 cm to inches
      • 70 cm to inches
      • 80 cm to inches
      • 90 cm to inches
      • 100 cm to inches
      • 120 cm to inches
      • 150 cm to inches
    • Centimeters to Feet Converter >
      • 150 cm to feet
      • 160 cm to feet
      • 162 cm to feet
      • 163 cm to feet
      • 164 cm to feet
      • 165 cm to feet
      • 170 cm to feet
      • 172 cm to feet
      • 173 cm to feet
      • 175 cm to feet
      • 178 cm to feet
      • 180 cm to feet
      • 182 cm to feet
      • 183 cm to feet
      • 185 cm to feet
      • 190 cm to feet
    • Watts to Amps Calculator >
      • 500 Watts to Amps
      • 800 Watts to Amps
      • 1000 Watts to Amps
      • 1200 Watts to Amps
      • 1500 Watts to Amps
      • 2500 Watts to Amps
      • 3000 Watts to Amps
      • 5000 Watts to Amps
    • MCG to MG Converter >
      • 5 mcg to mg
      • 10 mcg to mg
      • 50 mcg to mg
      • 100 mcg to mg
      • 125 mcg to mg
      • 200 mcg to mg
      • 250 mcg to mg
      • 300 mcg to mg
      • 400 mcg to mg
      • 500 mcg to mg
      • 1000 mcg to mg
  • Date & Time
    • Time Duration Calculator
    • Time Conversion Chart
    • Military Times Chart
    • Military Time Now Clock
    • Military Time Converter
    • GMT Time Clock
    • Time Zone
    • Age Calculator
  • Test Prep
    • CFA Exam Overview >
      • How to Prepare for CFA level 1: An Actionable Study Guide
      • 20 CFA Level 1 Practice Questions
      • CFA Practice Questions for level 1
      • 30 CFA Level 1 Practice Questions
      • CFA Level 2 Practice Exam Questions
      • CFA Sample Practice Questions | Level 3| Answers and Explanations
      • CFA Exam Requirements
      • CFA Level 3 Salary
    • SAT Practice Test Math
    • Math Practice Test HiSET
    • Acing the SAT: A Comprehensive and Actionable Study Guide
    • GMAT Practice Questions Math with Answers and Explanations
    • GMAT Math Formulas Sheet
    • Math Practice Test for GED with Answers and Explanations
    • Math Problems to Solve | Practice Test
    • Free Practice TEAS Test
    • ​GRE Practice Math Questions | Free | Answers & Explanations
    • Formulas for GRE Math Section
    • ACT Practice Test with Answers and Explanations
    • CPA Practice Questions
    • ASVAB Practice Test
    • IQ Test
    • How many hours to study for CPA
    • How to Excel in Your CPA Exams: A Comprehensive Preparation Guide
  • Blog
  • Contact Us
    • Advertise Here
    • Privacy Policy
    • Useful Calculators and Converters
  • Español
    • XVIII Roman Numerals
    • XIX Roman Numerals
    • XX Roman Numerals
    • XXI Roman Numerals
    • XVIII Roman Numerals
    • XXII Roman Numerals
    • XXIII Roman Numerals
    • XXIV Roman Numerals
    • XXV Roman Numerals
    • XXVI Roman Numerals
    • XXVII Roman Numerals
    • XXVIII Roman Numerals
    • XXIX Roman Numerals
    • XXX Roman Numerals
    • XXXI Roman Numerals
    • XXXII Roman Numerals
    • XXXIII Roman Numerals
    • XXXIV Roman Numerals
    • XXXV Roman Numerals
    • XXXVI Roman Numerals
    • XXXVII Roman Numerals
    • XXXVIII Roman Numerals
    • XXXIX Roman Numerals
    • XL Roman Numerals
    • XLI Roman Numerals
    • XLII Roman Numerals
    • XLIII Roman Numerals
    • XLIV Roman Numerals
    • XLV Roman Numerals
    • XLVI Roman Numerals
    • XLVII Roman Numerals
    • XLVIII Roman Numerals
    • XLIX Roman Numerals
    • L Roman Numerals
    • LI Roman Numerals
    • LII Roman Numerals
    • LIII Roman Numerals
    • LIV Roman Numerals
    • LV Roman Numerals
    • LVI Roman Numerals
    • LVII Roman Numerals
    • LVIII Roman Numerals
    • LIX Roman Numerals
    • LX Roman Numerals
    • LXI Roman Numerals
    • LXII Roman Numerals
    • LXIII Roman Numerals
    • LXIV Roman Numerals
    • LXV Roman Numerals
    • XVIII Roman Numerals
    • TEMP XVII Roman Numerals
    • XVIII Roman Numerals >
      • TEMP XVII Roman Numerals
  • Mole Calculator
  • BMI Calculator
  • Tic Tac Toe
  • 100s Chart -Printable
  • Online Timer
  • Online Stopwatch
  • How Many Days Until Chritmas
  • ​Simple Interest Formula Explained
  • Understanding Simple Interest vs. Compound Interest
  • 10 Real-World Simple Interest Examples
  • 20 Simple Interest Problems
  • Compound Interest Practice Problems
  • 34 lb to kg
  • 36 lb to kg
  • 37 lb to kg
  • 38 lb to kg
  • 39 lb to kg
  • 41 lb to kg
  • 42 lb to kg
  • 43 lb to kg
  • 44 lb to kg
  • 46 lb to kg
  • 47 lb to kg
  • 48 lb to kg
  • 49 lb to kg
  • 51 lb to kg
  • 52 lb to kg
  • 53 lb to kg
  • 54 lb to kg
  • 56 lb to kg
  • 57 lb to kg
  • 58 lb to kg
  • 59 lb to kg
  • 61 lb to kg
  • 62 lb to kg
  • 63 lb to kg
  • 64 lb to kg
  • 65 lb to kg

A Blogger's Exploration of Visual Storytelling Tools: CapCut's AI

1/2/2024

0 Comments

 
As the curator of z-table.com, a platform dedicated to the beauty of statistics and mathematics (yeah I know you might object but I find numbers beautiful), I've always been fascinated by the interplay between numbers and narratives. Recently, I've been contemplating launching a YouTube channel to bring mathematical concepts to life through storytelling. In this quest, I've explored various visualization tools and stumbled upon CapCut, an online video and photo editing solution with intriguing features for narrative transformation. While I haven't used CapCut personally, my research into its capabilities has revealed its potential in adapting literary classics to visual media, something that could be invaluable in visualizing mathematical stories. The exploration of CapCut emerged from a desire to break down the complex world of mathematics into engaging, digestible visuals that can capture the imagination of viewers. The platform promises a blend of technological innovation and artistic creativity, potentially bridging the gap between the abstract nature of mathematics and the concrete realm of visual storytelling. This journey isn't just about finding the right tool; it's about reshaping the way we perceive and engage with mathematical concepts. By weaving numbers into visual narratives, we can unlock a new dimension of understanding and appreciation, making mathematics not just a subject to be learned, but a story to be experienced.

The Intersection of Technology and Storytelling: CapCut's Core Tools

At the forefront of CapCut are two groundbreaking features: the video to text  converter and the Image Upscaler. These tools transform written content into engaging visual sequences, a process that resonates with my mission to visually interpret mathematical theories and stories.

Deep Dive into CapCut's Video-to-Text Converter

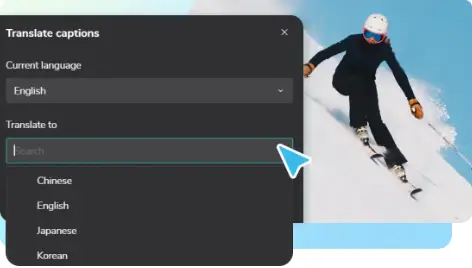
The Video-to-Text converter goes beyond basic transcription. It interprets the essence and mood of the source material, turning it into a visual narrative. This aligns with my vision for the YouTube channel, where complex mathematical concepts could be translated into engaging visual stories, making them accessible and relatable.
Picture

Enhancing Visuals with the Image Upscaler

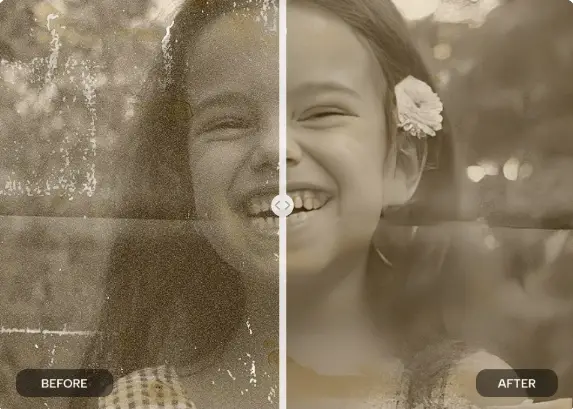
CapCut's image upscaler adjusts images to fit the narrative's context and mood. This feature could be instrumental in emphasizing specific aspects of mathematical stories or theories, enhancing the visual impact and understanding for viewers.
Picture

Balancing Text and Visuals: A Crucial Aspect for Mathematical Narratives

Adapting textual content to visual formats is particularly challenging when dealing with abstract concepts like mathematics. CapCut's tools seem capable of addressing this by creating visuals that are not only faithful to the original concept but also enrich the storytelling experience.

Fostering Creative Freedom in Mathematical Storytelling

The flexibility offered by CapCut is inspiring. It suggests possibilities for diverse storytelling approaches, from direct interpretations to more abstract, artistic renditions of mathematical narratives.

Exploring the Evolution of Adaptation in Educational Content

In my journey to find the right tools for the YouTube channel, CapCut's approach to adaptation stood out. Its integration of text-to-video conversion with image scaling offers a comprehensive toolkit for creating educational and engaging content.

Broadening the Scope of Mathematical Visualization

CapCut's features could potentially allow creators to delve into various genres, making intricate mathematical concepts visually interpretable and engaging. This could revolutionize the way mathematics is presented and understood by a broader audience.

CapCut's Potential in Educational Content Creation

The educational implications of CapCut's features are vast. They could be used to create compelling visual representations of mathematical theories and histories, making them more relatable and comprehensible, especially for visual learners.

The Future of Storytelling in Mathematics Education

Looking ahead, the impact of tools like CapCut on storytelling, particularly in educational contexts like mathematics, could be profound. They offer new ways to merge technology and creativity, enriching the learning experience.

The Road Ahead for z-table.com and Beyond

In conclusion, my exploration of CapCut, while still in the research phase, has opened up new avenues for considering how we can adapt complex narratives, like those in mathematics, into visually engaging formats. While CapCut primarily focuses on literary classics, its principles and tools offer valuable insights for my endeavors in visualizing mathematical concepts. As I continue to explore and plan for the upcoming YouTube channel, CapCut stands as an example of the innovative tools available to transform the way we understand and appreciate the intricate world of mathematics and storytelling. The potential of tools like CapCut extends beyond mere content creation; they represent a paradigm shift in educational methodologies. By integrating these tools into z-table.com's content strategy, we can revolutionize the way mathematical stories are told and understood. The future of mathematics education lies in the ability to merge technology with narrative, transforming abstract concepts into captivating visual stories that resonate with a diverse audience. Our journey with CapCut marks the beginning of an exciting chapter in visual storytelling, one where mathematics becomes not just a subject to study, but a universe to explore and marvel at through the lens of innovative technology and creative expression.
0 Comments

Solar Time Explained: Understanding the Dance of Daylight

12/11/2023

0 Comments


Solar Time Explained: Understanding the Dance of Daylight

Welcome to our exploration of solar time, a concept as old as the sun and as timeless as the rotation of the Earth. In our fast-paced, clock-driven world, it’s easy to forget that our primary timekeeper is, in fact, a star located some 93 million miles away. In this post, we delve into the fascinating world of solar time, a system that has governed the rhythms of human life for millennia.

The Basics of Solar Time

Solar time is based on the position of the sun in the sky, a natural method of timekeeping that predates mechanical clocks. The fundamental unit of solar time is the solar day, which is the time it takes for the sun to return to its highest point in the sky.

Apparent Solar Time

Apparent solar time directly corresponds to the position of the sun. It's measured using a sundial, with noon occurring when the sun is at its highest point in the sky. However, due to the elliptical shape of Earth's orbit and its axial tilt, the length of a solar day varies throughout the year.

Mean Solar Time

To counter this variation, mean solar time was developed. It averages out the differences over the year, creating a consistent measure of time. This is the basis of our 24-hour day. Greenwich Mean Time (GMT) is a type of mean solar time set at the Royal Observatory in Greenwich, London.

Solar Time vs. Standard Time

While solar time is determined by the sun's position, standard time is a fixed time standard used by countries and regions. This standardization was necessary with the advent of railways and telecommunication, as it became important to have a common timekeeping system that wasn’t as variable as solar time.

Time Zones

The world is divided into time zones, each generally representing one hour of mean solar time. The concept of a 24-hour day divided into time zones is a compromise between solar time, which changes slightly every day, and our need for a consistent schedule.

Daylight Saving Time: An Adjustment to Solar Time

Daylight Saving Time (DST) is a modern adjustment to standard time, advancing clocks during warmer months to extend evening daylight. While it modifies our standard timekeeping, it's a nod to the natural changes in daylight, a remnant of our connection to solar time.

The Importance of Solar Time Today

Even in our world of atomic clocks and GPS time signals, solar time remains relevant. It reminds us of our planet's dance with the sun and the natural rhythms of day and night. Observatories and astronomers still use it to track celestial events, and it continues to fascinate those interested in the interplay between natural and artificial timekeeping systems.

As we wrap up this journey through the realm of solar time, it’s clear that our lives are still intertwined with the movements of celestial bodies. Understanding solar time enriches our appreciation of both the natural world and our human-made constructs of time. It's a beautiful reminder of how our planet's rotation and orbit around the sun shape our perception of time, influencing everything from the structure of our days to the technology that keeps us ticking.

For real-time military time, you can check the military time clock. Additionally, you can also explore the GMT time clock.

0 Comments

​How GRE Scores are Calculated: Detailed Guide to the Exam Scoring

5/21/2023

0 Comments

 
The Graduate Record Examinations (GRE) is a standardized test that is an admissions requirement for most graduate schools in the United States. It measures a candidate's skills in analytical writing, verbal reasoning, and quantitative reasoning. Understanding how GRE scores are calculated is vital in helping test-takers strategize and prepare effectively. Let's delve into the process in detail.

1. Overview of GRE Score Calculation
The GRE consists of three scored sections: Verbal Reasoning (130-170 score scale), Quantitative Reasoning (130-170 score scale), and Analytical Writing (0-6 score scale). The Verbal Reasoning and Quantitative Reasoning sections follow a computer-adaptive by section (CABS) model, meaning the performance in the first section of each dictates the difficulty level of the second section.

2. Verbal and Quantitative Reasoning Scores
The Verbal Reasoning and Quantitative Reasoning sections each consist of two sections. The raw score, which is simply the number of questions you answered correctly, is calculated for each of these sections.

The first section of both the Verbal and Quantitative Reasoning sections is of medium difficulty. Based on your performance on this first section, you are then directed to a second section of a difficulty level that matches your ability as determined from your performance on the first section.

Scores for the Verbal and Quantitative sections are determined by a raw score, which is the total number of questions answered correctly across the two sections. This raw score is then converted into a scaled score through a process called equating, which accounts for minor variations in difficulty between different test editions. The scaled score is what you receive in your final GRE score report.

3. Analytical Writing Scores
The Analytical Writing section consists of two essays: an "Analyze an Issue" task and an "Analyze an Argument" task. Each essay is scored by at least two readers on a 0-6 point scale in half-point increments.

For each essay, if the two scores differ by less than one point, the scores are averaged to obtain the final score. If the scores differ by more than one point, the essay goes to a third reader, and the two scores that are closest are averaged to determine the final score.

4. Experimental Section
The GRE also contains an additional unscored Experimental section, which can be either Verbal or Quantitative. This section does not count toward your final score; it's used by ETS (the organization that administers the GRE) to test out questions for use in future tests.

5. Final Score Reports
Your official GRE score report includes your scores for the Verbal Reasoning, Quantitative Reasoning, and Analytical Writing sections. It also includes percentile ranks, which indicate the percentage of test takers who scored lower than you.
 
GRE Scoring Example
A concrete example might make the GRE scoring process clearer. Let's imagine a test-taker named Jane, who is taking the GRE General Test.

Verbal and Quantitative Reasoning Scores
Jane answers 15 out of 20 questions correctly on the first Verbal Reasoning section. Given this performance, the GRE software decides to give her a second Verbal Reasoning section of medium difficulty. On this section, she gets 16 out of 20 correct.

Her raw score for Verbal Reasoning is thus 31 (15 from the first section + 16 from the second section). This raw score is then converted into a scaled score through equating. Equating is a process that accounts for minor differences in difficulty between test versions. So, Jane might end up with a final Verbal Reasoning score of, say, 155.

The same process applies to the Quantitative Reasoning section. If Jane answers 17 out of 20 questions correctly in the first section and 18 out of 20 in the second section, her raw Quantitative score would be 35. Let's say this converts to a scaled score of 160.

Analytical Writing Scores
For the Analytical Writing section, Jane writes two essays.
Her first essay (Analyze an Issue) receives scores of 5.0 and 4.5 from the two initial readers. Since the two scores are within one point of each other, they are averaged to give a final score of 4.75 for this essay.

For her second essay (Analyze an Argument), one reader gives a score of 5.0, but the other gives a 3.5. The difference is more than one point, so a third reader reviews the essay and gives a score of 4.0. The scores closest together (4.0 and 3.5) are averaged, yielding a final score of 3.75 for this essay.

The scores from the two essays are then averaged. In this case, the average of 4.75 and 3.75 is 4.25, which is rounded to the nearest half-point, yielding a final Analytical Writing score of 4.5.

Final Score Report
On her final GRE score report, Jane receives a Verbal Reasoning score of 155, a Quantitative Reasoning score of 160, and an Analytical Writing score of 4.5. For each score, she will also see a percentile rank, showing the percentage of test takers who scored lower than she did.
Remember, Jane's scores are hypothetical. The raw to scaled score conversion can vary from test to test due to the equating process used by ETS.
 
Conclusion
Understanding how GRE scores are calculated is essential for effective test preparation. It can help you focus on areas that need improvement and strategize how to answer questions to maximize your score. With this knowledge, you can approach your GRE test date with confidence.

Remember, preparation is key to achieving a high score on the GRE. Utilize this understanding of the scoring system to guide your study plan and manage your time effectively during the test. Take our GRE practice questions and test your knowledge.

0 Comments

How is GMAT score calculated

5/21/2023

0 Comments

 
The Graduate Management Admission Test, more commonly known as the GMAT, is a critical component of the application process for many top business schools worldwide. But the way in which the GMAT score is calculated can be somewhat complex and often misunderstood. In this article, we'll break down the formula for calculating your GMAT score and provide an overview of how the scoring system works. If after reading this post, you want to try out a GMAT mock text try to answer these GMAT practice questions.

Overview of the GMAT

​The GMAT consists of four sections:
  1. Analytical Writing Assessment (AWA)
  2. Integrated Reasoning (IR)
  3. Quantitative Reasoning (Quant)
  4. Verbal Reasoning (Verbal)
Each of these sections is scored separately, and then two of them (Quant and Verbal) are combined to form a total score. It's essential to note that the total GMAT score does not include the AWA and IR scores.
how is gmat score calculated?

The Scoring Breakdown

Let's now look at each of the GMAT sections and how their scores are calculated.

1. Analytical Writing Assessment (AWA)
In this section, you are asked to write an essay. This essay is then scored on a scale of 0 to 6, in half-point increments. Your essay is scored twice: once by a computerized system and once by a human grader. The average of these two scores is your final AWA score.

2. Integrated Reasoning (IR)
In the IR section, you're required to interpret and analyze information presented in various formats. Your IR score ranges from 1 to 8, in one-point increments. This score is based solely on the number of questions you answer correctly; there's no penalty for wrong answers.

3. Quantitative and Verbal Reasoning
Both the Quant and Verbal sections are computer-adaptive, meaning the difficulty of questions adjusts based on your performance. In other words, the better you perform, the more challenging the questions become. Your scores for these sections range from 6 to 51.
The Total GMAT ScoreThe total GMAT score is a scaled combination of the Quant and Verbal scores and ranges from 200 to 800. This score does not include the AWA and IR sections. About two-thirds of test-takers score between 400 and 600.

The Quant and Verbal scores are scaled to account for differences in overall difficulty from one test to another. Therefore, the raw score (the number of questions answered correctly) isn't enough to determine your scaled score.

The scaled scores for the Quant and Verbal sections are then combined and converted into a total score. This score is presented along with a percentile ranking, which tells you what percentage of test takers you performed better than.

For example, a 700 GMAT score would mean you performed better than 88% of test-takers. This percentile ranking is crucial for business schools as it gives them a clear idea of where you stand among other candidates. Check out our mock GMAT 10 question test to get a better sense of how GMAT tests are structured.
​

Final Thoughts

Understanding how the GMAT score is calculated can help you build an effective study strategy. Remember, each section requires different skills, and therefore, you should tailor your preparation accordingly. Also, while your total GMAT score is critical, don't underestimate the importance of the AWA and IR sections. Many schools use these scores to assess your analytical writing and integrated reasoning skills, which are essential for success in the business world.
​
Overall, achieving a high GMAT score is about more than just knowing the right answers. It's about demonstrating a range of skills and capabilities that business schools value. The more you understand about the test and its scoring system, the better equipped you'll be to excel.

Take our GMAT practice questions with explanations to test your knowledge.
0 Comments

AIC Calculation: How to Use Akaike Information Criterion for Model Selection

5/1/2023

0 Comments

 
AIC calculation, or Akaike Information Criterion calculation, is a helpful tool for comparing statistical models and determining which one is the most appropriate for a given dataset. Essentially, AIC calculates the relative quality of each model by balancing its accuracy against its complexity.
 
When analyzing a dataset, statisticians often have multiple models to choose from that could fit the data. However, not all models are created equal; some may be too simple and fail to capture key patterns, while others may be too complex and overfit the data. This is where AIC comes in - it considers both the goodness of fit and the simplicity of a model to give a single number for each model, allowing statisticians to objectively compare them.
 
The goal of AIC calculation is to find the model with the lowest AIC value, indicating the best balance of accuracy and simplicity. While it's not a perfect method, AIC has become a widely accepted approach for model selection that can be applied to a variety of statistical techniques. With the help of AIC, we can make confident decisions about which models are most appropriate, providing insights that could inform future studies or applications.

Understanding AIC Calculation


AIC, or Akaike Information Criterion, is a statistical measurement used to determine which model best fits a given set of data. Essentially, it provides a quantitative way to compare different models and select the one that is most appropriate for the data.

 
There are two main components to the AIC formula: the likelihood function and a penalty term. The likelihood function measures how well the model fits the data, while the penalty term adjusts for the number of parameters included in the model. The idea behind this penalty term is that more complex models, with more parameters, are likely to overfit the data and ultimately perform worse on new data than simpler models.
 
AIC values are calculated for each model under consideration, and the model with the lowest AIC value is considered the best fit for the data. This means that lower AIC values indicate a better model fit.
 
Let's take a look at an example. Say we are trying to predict the price of a house based on its square footage and number of bedrooms. We have two models we are considering: one that includes only square footage, and another that includes both square footage and number of bedrooms.
 
Using AIC, we can calculate the AIC values for both models and see which one is a better fit for the data. Let's say the AIC values for the two models are 500 and 550, respectively. This means that the model with only square footage has a lower AIC value and is therefore a better fit for the data.
 
It's important to note that AIC is just one tool in the data modeling toolbox, and should not be the only factor in selecting a model. Other considerations, such as interpretability and domain knowledge, should also be taken into account. However, AIC can be a helpful starting point in the model selection process.
 
When conducting statistical analysis, it's crucial to select the best fitting model to describe the relationship among variables. The Akaike information criterion (AIC) is a powerful tool for model selection that helps in identifying the model that best represents the data. AIC is an estimator of the relative quality of statistical models for a given set of data. The AIC value of a model depends on the number of model parameters and the goodness of fit. The lower the AIC value, the better the model.

There are several reasons why AIC is important in statistical analysis:

 
  • AIC identifies the best model. AIC helps to identify the model that best describes the relationship among variables. It considers both the goodness of fit and the complexity of the model, which helps to avoid overfitting. Overfitting occurs when a model is too complex, causing it to fit the training data extremely well but not generalize well to new data. AIC penalizes complex models, making it a better estimator of the true model.
  • AIC is useful in comparing models.  AIC makes it easy to compare two or more models and choose the best one. The AIC values of the models are compared, and the model with the lowest AIC value is chosen as the best model.
  • AIC helps in model building. AIC provides a way to assess the quality of different models and identify the best one. The model with the lowest AIC value is selected as the best model and then used for further analysis. This approach improves the accuracy of predictions and reduces the chance of overfitting.
  • AIC is applicable to different types of models. AIC can be applied to different types of models, including linear regression, non-linear regression, and time-series analysis. This makes it a versatile tool that can be used in many different fields, including finance, economics, biology, and social sciences.

Steps for Performing AIC Calculation

When it comes to model selection, the Akaike Information Criterion (AIC) is one of the most commonly used techniques. AIC is a measure that helps to determine how well a statistical model fits the data while taking into account the complexity of the model. Here are the steps involved in performing AIC calculation:

Step 1: Select your statistical model

 
To begin with, you'll need to choose a statistical model that fits your data. This model can be selected based on:
 
- Expert knowledge
- Heteroscedasticity
- Residual plots
 
Step 2: Estimate the model parameters
 
Once you've selected your model, you'll need to estimate its parameters. This can be done using maximum likelihood estimation (MLE). The MLE method seeks to find the parameter values that maximize the likelihood function of the model, given the data.
 
Step 3: Calculate the AIC value
 
Next, you'll need to calculate the AIC value for your model. The AIC value takes into account the complexity of the model and the goodness-of-fit:
 
- Calculate the log-likelihood of the model
- Add the product of the number of model parameters and 2 to the log-likelihood score
- This gives you the AIC value, where lower values indicate better-fitting models
 
Step 4: Compare AIC values
 
After obtaining AIC values for each model of interest, you can compare them to identify the best-fitting model. The model with the lowest AIC value is preferred as it strikes a balance between fit and complexity.

Interpreting AIC Results

When interpreting the results of Akaike Information Criterion (AIC), there are a few important factors to consider. AIC is used to compare models and select the one that fits best with the data. It is important to note that a lower AIC value indicates a better fit.
 
Here are some key points to keep in mind when interpreting AIC results:
 
  • A model with the lowest AIC value is preferred over others, as it has the best fit to the data.
  • A difference of 2 or more in AIC values indicates a significantly different model fit.
  • AIC values cannot be interpreted in absolute terms, as they depend on the number of data points and model complexity.
  • Always compare AIC values of models being considered, as a model with lower AIC does not necessarily mean it is best in absolute terms.
 
To better understand the significance of AIC, let's take an example of a linear regression model with two predictors. We fit two models- one with both predictors and the other with only one predictor. The AIC values for the models are 100 and 105, respectively. According to the threshold of 2 or more difference in AIC values, we can confidently say that the model with both predictors has a significantly better fit, as compared to the one with only one predictor.
 
On the other hand, if we compare two models with AIC values of 500 and 502, respectively, we cannot confidently say that the model with the lower AIC value is a better fit, given the small difference of just 2 units. It's important to note that the interpretation of AIC values requires critical thinking and domain knowledge.

Advantages and Limitations of AIC Calculation

When it comes to statistical model selection, AIC (Akaike Information Criterion) is a widely-adopted approach due to its simple implementation and robustness in many scenarios. However, there are several advantages and limitations of AIC calculation that we should take into consideration.

 Advantages of AIC Calculation

  • AIC is computationally efficient. AIC calculation is a relatively simple method that requires only a few model parameters. As a result, it can be easily implemented in most cases with minimal computational resources.
  • AIC allows for easy comparison of different models. AIC can be used to compare models with different numbers of parameters or even different variable sets, allowing us to identify the optimal model given the data. 
  • AIC is widely accepted in the statistics community. AIC has become a well-established method for statistical model selection, with its use having been demonstrated in a wide range of fields and scenarios.

Limitations of AIC Calculation

  • AIC assumes a specific form of model distribution. AIC follows the assumption of the normal distribution of model errors. If this assumption is not met, AIC may provide inaccurate or biased results.
  • AIC is not always appropriate for small sample sizes. AIC is a likelihood-based approach, which implies that it requires a large sample size to avoid overfitting. In cases where the sample size is small, AIC may not perform well.
  • AIC does not consider the possibility of model misspecification. AIC provides a measure of relative goodness-of-fit between models but does not account for the model's ability to capture the underlying data-generating process.
 
AIC has several advantages over other model selection methods, such as its simplicity and computational efficiency. However, AIC's limitations should also be taken into account, such as its assumption of the error distribution and its suitability for small sample sizes.

​The AIC Formula Explained

The AIC value is calculated using the following formula:

AIC = 2k - 2ln(L)

where
  • k = number of parameters in the model
  • L = maximum value of the likelihood function for the estimated model parameters
The AIC formula penalizes models for a large number of parameters and rewards models for goodness of fit. A model with a lower AIC value is preferred over a model with a higher AIC value.
aic calculation formula
For example, suppose we have two models with AIC values of 100 and 105. Here, we can say that the model with an AIC value of 100 is a better model compared to the model with an AIC value of 105.

There are a few things to keep in mind while using AIC for model selection:
  • AIC should be used for comparing models based on their relative AIC values, and not their absolute AIC values.
  • If the AIC values of two models are close, then we should choose the model that is simpler (i.e., has fewer parameters).
  • AIC assumes that the models being compared are nested (i.e., one model is a simplified version of the other model).

Delta Scores and Akaike Weights

Delta scores measure the difference in fit between a model and a baseline model, while Akaike weights provide a way to rank models based on their relative quality of fit. These measures are commonly used in various fields, including economics, ecology, and biology.
 
Delta scores are calculated by subtracting the Akaike information criterion (AIC) of one model from another. AIC is a measure of the quality of a statistical model, taking into account both the goodness of fit and the complexity of the model. The model with the smaller AIC is considered to be the better fit. Delta scores can be used to compare different models and determine which one fits the data better.
 
Akaike weights, on the other hand, provide a way to rank models based on their relative quality of fit. These weights are derived from the AIC of each model and represent the probability that a given model is the best fitting model among the set of candidate models. This allows researchers to compare not only the fit of different models but also the likelihood of each model being the best fit for the data.

Understanding Akaike weights

It's important to note that Akaike weights are calculated using a delta score. The delta score is the difference between the number of parameters in two models and their corresponding AIC values. AIC stands for Akaike Information Criteria, which is a statistical measure used to evaluate the quality and fitness of a model.
 
The Akaike weight of a given model can range from 0 to 1, with 0 indicating that the model is not a good fit for the data, and 1 indicating that the model is the superior fit. If two models have similar weights, it may indicate that they are both a good fit for the data.
 
Calculating Akaike weights involves comparing several models and their respective delta scores. The formula for calculating delta scores is as follows:
 
delta i= AICi - min(AIC)

The formula for calculating Akaike weights is as follows:
 
wi = (exp(-0.5*delta i))/sum(exp(-0.5*delta i))

Where wi is the Akaike weight, delta i is the delta score for the ith model, and sum(exp(-0.5*delta i)) is the sum of the exponentials of the delta scores for each model.
Akaike weights formula
Akaike weights are an important tool for evaluating model accuracy and selecting the best model for a specific dataset. By using delta scores to compare different model fits, we can calculate the likelihood of each model to minimize prediction error and identify which model has the best fit for the data.

Summing Up Akaike's Information Criterion (AIC) Calculation

 
In conclusion, calculating Akaike's Information Criterion (AIC) allows us to determine the best statistical model for a given dataset. Through this process, we can compare the performance of different models and select the best one based on the AIC score.
 
After performing AIC calculations on our dataset, we have determined that the model with the lowest AIC score is the most appropriate for our data. This indicates that this model has the best balance between goodness-of-fit and parsimony.
 
In addition, we have also found that AIC values can be used to compare models with different numbers of parameters. By using the AICc correction, we can adjust for small sample sizes and obtain more accurate model comparisons.
 
Overall, AIC calculation is a valuable tool for model selection and provides a useful framework for making informed decisions in statistics.

For more helpful math and statistics resources check out z-table.com.
0 Comments

​Variability Definition in Statistics: Understanding Variability and Its Importance in Data Analysis

4/29/2023

0 Comments

 
Statistics is a part of mathematics that focuses on the collection, analysis, interpretation, and presentation of numbers. One of the fundamental concepts in statistics is variability, which refers to the degree of spread or dispersion of a set of data. In this post, we will explore the variability definition in statistics and its importance in data analysis.

What is Variability in Statistics?

Variability, also known as dispersion, is a measure of how spread out a set of data is. It refers to the differences or variations that exist among the values in a data set. Variability can be observed in various statistical measures, such as range, variance, standard deviation, and coefficient of variation.
​

The concept of variability is essential in statistics because it provides valuable information about the characteristics of the data set. For example, a data set with high variability indicates that the values are widely spread out and may have extreme values, while a data set with low variability indicates that the values are closely clustered around the mean or average.

Measures of Variability in Statistics

As mentioned earlier, variability can be measured using different statistical measures. Let's discuss some of these measures:

Range

The range is the difference between the highest and lowest values in a data set. It is a simple measure of variability that describes how dispersed the data is. However, it has limitations as it only considers the two extreme values and does not provide information about the distribution of the data.

Variance

Variance is a measure of how far the data is spread out from its mean. It is calculated by taking the sum of the squared deviations of each data point from the mean and dividing it by the total number of observations minus one. The formula for variance is:

Variance = Σ (xi - μ)2 / (n - 1)

Where Σ is the sum, xi is the data value, μ is the mean, and n is the sample size.
The variance is useful in identifying how much variation exists in the data set. A high variance indicates that the data points are far away from the mean, while a low variance indicates that the data points are close to the mean.
variability in statistics: variance formula
Standard Deviation

Standard deviation is the square root of variance. It is a widely used measure of variability that provides information about the dispersion of the data points around the mean. The formula for standard deviation is:

Standard Deviation = √(Σ (xi - μ)2 / (n - 1))

The standard deviation is often used in statistics because it is easy to interpret and has useful properties, such as the empirical rule.

Coefficient of Variation

The coefficient of variation is a measure of relative variability that is useful when comparing data sets with different means and units. It is calculated by dividing the standard deviation by the mean and multiplying the result by 100. The formula for the coefficient of variation is:

Coefficient of Variation = (Standard Deviation / Mean) x 100
​

The coefficient of variation provides a way of comparing the degree of variability between data sets of different scales.

Importance of Variability in Data Analysis

Variability is an essential concept in data analysis as it provides valuable insights into the nature of the data set. Here are some of the reasons why variability is important in data analysis:

Identifying Outliers

Outliers are data points that lie far away from the other values in the data set. Variability measures, such as standard deviation and variance, can help identify outliers by indicating the degree of spread or dispersion in the data.

Making Inferences

Variability measures are essential in making statistical inferences about the population based on sample data. The variability measures, such as standard deviation, variance, and coefficient of variation, provide information about how closely the sample data represents the population. A low variability indicates that the sample data is more representative of the population, while a high variability indicates that the sample data may not be representative.

Evaluating Data Quality

Variability measures are useful in evaluating the quality of data. A high variability may indicate errors in data collection or measurement, while a low variability may indicate a lack of diversity or insufficient sample size.

Monitoring Process Stability

Variability measures are often used in process control to monitor the stability of a process. A stable process is one that produces consistent results with low variability, while an unstable process produces inconsistent results with high variability.

Comparing Data Sets

Variability measures, such as the coefficient of variation, are useful in comparing data sets with different means and units. The coefficient of variation provides a standardized measure of variability that can be used to compare the degree of variation between data sets.
​
To summarize, variability is a fundamental concept in statistics that refers to the degree of spread or dispersion of a set of data. Variability measures, such as range, variance, standard deviation, and coefficient of variation, provide valuable information about the characteristics of the data set. Variability is important in data analysis as it helps identify outliers, make inferences, evaluate data quality, monitor process stability, and compare data sets. By understanding variability, we can gain a deeper insight into the nature of the data and make more informed decisions based on the data analysis.
 

0 Comments

​Do You Round Z Scores? Understanding Z-Score Rounding

3/5/2023

0 Comments

 
Z-scores are a common statistical tool used to compare data points in a distribution. They measure how many standard deviations a data point is from the mean of the distribution. While calculating z-scores is a fairly straightforward process, rounding them can be a bit more complex. In this article, we'll discuss the concept of z-score rounding and whether it's necessary in statistical analysis.

What is Z-Score Rounding?

Z-score rounding is the process of reducing a calculated z-score to a specified number of decimal places. In some cases, it may be necessary to round z-scores for easier interpretation or to comply with reporting guidelines. However, rounding can also result in a loss of precision and may lead to incorrect conclusions.
do you round z scores

When Should You Round Z-Scores?

There are no hard and fast rules for when to round z scores. In general, rounding is more common when reporting z-scores to a wider audience, such as in scientific publications or business reports. In these cases, rounding to two or three decimal places is often recommended.

For example, let's say you're comparing the test scores of two different classes. The mean score for Class A is 75, with a standard deviation of 10, while the mean score for Class B is 85, with a standard deviation of 15. You calculate the z-scores for both classes and get the following results:

Class A: z = (80 - 75) / 10 = 0.5 Class B: z = (80 - 85) / 15 = -0.33

In this case, you might choose to round the z-scores to two decimal places to make them easier to interpret:

Class A: z = 0.50 Class B: z = -0.33

However, it's important to note that rounding z-scores can lead to inaccurate conclusions if the rounding is not performed correctly. For example, rounding the z-score for Class B to one decimal place would give a value of -0.3, which could lead to the incorrect conclusion that Class B performed better than Class A.

In general, it's best to avoid rounding z-scores unless it's necessary for reporting purposes. If you need to compare z-scores, it's generally better to use the unrounded values to ensure maximum precision and accuracy.

Tools for Calculating Z-Scores

To calculate z-scores and determine whether rounding is necessary, you can use a z-score calculator. This calculator allows you to input the raw score, mean, and standard deviation to calculate the z-score.

If you need to determine the probability associated with a specific z-score, you can use a z-score probability calculator. This calculator allows you to input the z-score to find the probability associated with that score.

Finally, if you need to round z-scores to a specific decimal place, you can use a rounding calculator. This calculator allows you to input the z-score and specify the number of decimal places to round to.

Z-score rounding can be a useful tool for making z-scores easier to interpret or comply with reporting guidelines. However, it's important to use caution when rounding z-scores to avoid inaccuracies that could lead to incorrect conclusions. In most cases, it's best to use unrounded z-scores for maximum precision and accuracy in statistical analysis.

0 Comments

The Differences Between Descriptive And Inferential Statistics

11/3/2016

1 Comment

 
Usually, when you're doing research about groups of people or objects, you will use both descriptive and inferential statistics. ​

Descriptive Statistics

Descriptive statistics refer to the analysis of the data that will help you describe, summarize, or show the data in a way that some patterns might emerge. However, you need to be aware that you shouldn't withdraw conclusions besides the data analyzed. You should be simply describing the data you got.
 
Despite this might not seem important, it really has a crucial part in the process since it allows you to visualize huge data in a simple and effective way.
 
Imagine that you wanted to analyze the performance on a test of 100 students. You might be interested in seeing the overall performance or you might be interested in looking at the spread or distribution of their marks.
 
When you use the descriptive statistics, you should present your data by starting with a table that summarizes the group data, followed by charts and graphs. Finally, at the end, you should add the statistical commentary like the discussion of the results.
descriptive vs inferential statistics

Inferential Statistics

type of statistics in describing data
There are many occasions when you want to analyze a specific group but you simply can't have a sample of the entire population. Unlike on the previous example, you wanted to analyze the performance of 100 students, in this case, you might want to measure the performance of all the students in a country. Since it's not doable to collect all the data, you need to choose a smaller sample of students, which will represent all the students in that country. 
 
And this is where the inferential statistics have their crucial role. They refer to the techniques that you use that allow you to use the samples to make generalized comments regarding the entire population. So, as you understand, it's very important to be careful when selecting the sample that represents the population. It needs to be as accurate as it can or the results won't represent the truth. 
 
The descriptive and inferential statistics have one thing in common: they both rely on the same data. However, while the descriptive statistics only relies on this particular data, the inferential statistics relies on this data to make general conclusions about a larger population. 
 
In order to analyze the data, both descriptive and inferential statistics need to rely on some functions of the data. In the case of the descriptive statistics, it tends to rely on some classic statistics like the mean, standard deviation, min, max, skew, median, and kurtosis. In the case of the inferential statistics, they tend to use some classic statistics like the z score, t score, F-ratio, among others. 
 
So, which one should you choose to use? You may need to use both types of statistics and the answer depends on the purpose of your research. For example, when a company is trying to show if a new medicine will be able to help patients in the future, it's in their best interest that they use inferential statistics. If they decide to use descriptive statistics, they won't be able to withdraw any conclusions regarding the population in general but simply regarding the patients that participated in the study. ​

1 Comment

Calculate Standard Score with a Z Score Calculator

11/3/2016

1 Comment

 
z score calculation example
The z score, also known as the standard score, allows you not only to compare two scores from different normal distributions as it also allows you to calculate the probability of one specific score to occur within the normal distribution.
 
The z score, by taking into account the standard deviation (SD) of the group, standardizes a score with respect to the other scores in the group. When you convert a raw score into a z-score, you'll get a number between 0 (the mean) and 1 (the standard deviation). Basically, what you will be doing is that you'll be defining each score you have in terms of how far away each one is from the group mean.

Main Advantages Of Using Z-Scores:
 
There are mainly two advantages why so many different organizations use the z-scores:
 
-- Clarity: At a single glance, you can easily see how bad or good a score is when compared to the entire group.
 
-- Comparison: Being able to compare scores that are measured on different scales is definitely a huge advantage.
 
 
Results From The Z-Scores:
 
When you are looking at a z-score table, you have three distinct areas:
 
-- The Area Under The Curve: Looking at this part of the table will allow you to see the different properties of the normal distribution. So, you'll be able to see how many scores are under pre-determined limits as well as you'll be able to calculate the probability of a specific score to occur.
 
-- The Area Between The Mean And The Z: This area corresponds to the area under the curve, and that is between the mean and the z-scores. In this area, you can see the proportion of scores that are located between the mean and any given z-score.
 
-- The Area Beyond Z: In this area, you'll see the proportion of the scores that are greater than any given z-score.
​
 
 
Calculating The Z-Scores:
 
The easiest way to calculate a z-score is to use a z score calculator. However, in case you're interested in knowing how to calculate it by hand, you just need to find the difference between the score and the mean score, which tells you how far away the score is from the average score, and divide it by the standard deviation. Then you can use a z score table to find a probability.
 
There's no question that is far more effective and time-saving using a z score calculator. 

Normal distribution
1 Comment

Finding Z scores and the area under the  bell curve with ti-84

11/9/2015

1 Comment


Finding Z scores and the area under the bell curve with ti-84

1 Comment
<<Previous

    Z Score Table Blog

    Everything about normal distribution and Z scores

    Archives

    January 2024
    December 2023
    May 2023
    April 2023
    March 2023
    November 2016
    November 2015
    October 2015
    June 2015
    May 2015
    April 2015

    Categories

    All
    Rounding
    Statistics

    RSS Feed

  • Z Table
    • Z Scores to Percentiles Chart
    • Z Score Calculator
    • Z Score Probability Calculator
    • Interactive Z Table
    • Z Score Formula
    • How to calculate the z score
    • How To Use Z-Score Table
    • Calculate Z-score
    • Probability in Statistics
    • Parameters in Statistics
    • Percentile Rank
    • Z Score Chart Basics
    • History of Normal Distirbution
    • Statistics Z Score Jokes
    • When to Use Z Test vs T Test
    • Z Score Practice Problems
    • Z Score Problems
    • Normal Distribution Problems
    • Confidence Interval Calculator >
      • Confidence Interval in Excel
      • 90 confidence interval z score
      • 95 Confidence Interval Z Score
      • 99 Confidence Interval Z Score
    • Z Score Confidence Interval
  • Statistics
    • Statistics Symbols
    • Statistics Formulas >
      • Binomial Coefficient
      • Empirical Rule
      • Correlation Coefficient
    • P Value Calculator >
      • P Value Calculator from Z Score
      • P Value Calculator from T Score
      • P Value Calculator from Chi-Square
      • P Value Calculator from F Ratio (ANOVA)
      • P Value Calculator from Pearson R
      • P Value Calculator Tukey's Q Score
    • Cumulative Binomial Probability Calculator
    • Normal CDF Calculator >
      • Normal CDF Formula
      • Non-normal Distribution
      • How to find normal cdf ti 84
      • Examples of Standard Deviation
      • Sample Standard Deviation on Calculator
      • Standard Deviation vs Variance
      • Population vs. Sample
      • Quantitative vs. Qualitative Data
      • Formula of Standard Deviation for Grouped Data
      • Null Hypothesis vs. Alternative Hypothesis
      • Discrete vs. Continuous Data
      • Mean vs. Median vs. Mode
      • Bayesian vs. Frequentist Statistics
      • What is High Standard Deviation
      • What Does a Standard Deviation of 0 Mean
      • Observational Study vs. Experimental Study
      • Parametric vs. Non-parametric tests
      • What is 1 Standard Deviation Above the Mean
      • How to find correlation coefficient on ti 84
      • How to find linear regression on ti-84
      • How to find solving equations on ti-84
      • How to find quadratic regression on ti-84
      • How to find factorial on ti-84
      • How to find integrals on ti-84
      • How to find confidence intervals on ti-84
      • How to find z-score on ti-84
      • How to find derivatives on ti-84
      • How to find summation on ti-84
      • How to find anova on ti-84
      • How to find graphing functions on ti-84
      • How to find factorial on ti-89
      • How to find integrals on ti-89
      • How to find standard deviation on ti-89
      • How to find derivatives on ti-89
      • How to find linear regression on ti-89
      • How to find matrix operations on ti-89
      • How to find summation on ti-89
      • How to find variance on ti-89
      • How to find Correlation on TI-Nspire
      • How to find Variance on TI-Nspire
      • How to find Standard Deviation on TI-Nspire
      • What Does a Standard Deviation of 2 Mean
      • How to find Linear Regression on TI-Nspire
      • How to find Quadratic Regression on TI-Nspire
      • How to find Matrix Operations on TI-Nspire
      • How to find Solving Equations on TI-Nspire
      • How to find Graphing Functions on TI-Nspire
      • How to find Integrals on TI-Nspire
      • How to find Derivatives on TI-Nspire
      • How to find Summation on TI-Nspire
      • How to find Factorial on TI-Nspire
      • How to find Combinations and Permutations on TI-Nspire
      • How to find Z-Score on TI-Nspire
      • How to find Probability Distributions on TI-Nspire
      • How to find ANOVA on TI-Nspire
      • How to find Histograms on TI-Nspire
      • How to find Box-and-Whisker Plots on TI-Nspire
      • How to find Present and Future Value on TI-Nspire
      • How to find Confidence Intervals on TI-Nspire
      • Population Standard Deviation and Sample Standard Deviation
    • Correlation Calculator >
      • Covariance vs. Correlation
    • Dice Roller
    • Probability Distribution Calculator
    • Interquartile Range Calculator
    • Empirical Rule Calculator
    • Mean, Median and Mode Calculator
    • Average Calculator
    • Linear Regression Calculator
    • Sample Size Calculator
    • Other Statistical Tables >
      • T Value Table
      • Chi-Square Table
      • F Distribution Table
    • Standard Deviation Calculator
    • Standard Deviation Problems
    • Normal vs Non-Normal Distribution: Understanding the Differences
    • Covariance vs. Variance: Understanding the Differences
    • Explanatory Variable: Understanding Its Role in Statistical Analysis
    • Independent variable vs dependent
    • What is a Residual in Statistics?
    • Left Skewed vs. Right Skewed Distributions
    • How to Find Variance on ti 84
    • Real Life Examples of Correlation
    • What is Regression Analysis?
    • Statistics Forum
  • Math
    • Combination Calculator
    • How to Calculate a Combination
    • Combination Formula in Statistics
    • Permutation Calculator
    • Distance Between Two Points Calculator
    • Exploring 7 Unsolvable Math Problems >
      • Riemann Hypothesis
    • Math Problems >
      • Math Problems for 1st Graders
      • Math Problems for 2nd Graders
      • Math Problems for 3rd Graders
      • Math Problems for 4th Graders
      • Math Problems for 5th Graders
      • Math Problems for 6th Graders
      • Math Problems for 7th Graders
      • Math Problems for 8th Graders
      • Math Problems for 9th Graders
      • Math Problems for 10th Graders
      • Math Problems for 11th Graders
    • Times Tables >
      • 1 Times Table
      • 2 Times Table
      • 3 Times Table
      • 4 Times Table
      • 5 Times Table
      • 6 Times Table
      • 7 Times Table
      • 8 Times Table
      • 9 Times Table
      • 10 Times Table
    • Multiplication Tables >
      • Multiplication Table by 20
      • Multiplication Table by 19
      • Multiplication Table by 18
      • Multiplication Table by 17
      • Multiplication Table by 16
      • Multiplication Table by 15
      • Multiplication Table by 14
      • Multiplication Table by 13
      • Multiplication Table by 12
      • Multiplication Table by 11
      • Multiplication Table by 10
      • Multiplication Table by 9
      • Multiplication Table by 8
      • Multiplication Table by 7
      • Multiplication Table by 6
      • Multiplication Table by 5
      • Multiplication Table by 4
      • Multiplication Table by 3
    • Roman Numerals Chart
    • Roman Numerals >
      • Roman Numerals Converter
      • I Roman Numerals
      • II Roman Numerals
      • III Roman Numerals
      • IV Roman Numerals
      • V Roman Numerals
      • VI Roman Numerals
      • VII Roman Numerals
      • VIII Roman Numerals
      • IX Roman Numerals
      • X Roman Numerals
      • XI Roman Numerals
      • XII Roman Numerals
      • XIII Roman Numerals
      • XIV Roman Numerals
      • XV Roman Numerals
      • XVI Roman Numerals
      • XVII Roman Numerals
      • XVIII Roman Numerals
      • LXVI Roman Numerals
      • LXVII Roman Numerals
      • LXVIII Roman Numerals
      • LXIX Roman Numerals
      • LXX Roman Numerals
      • LXXI Roman Numerals
      • LXXII Roman Numerals
      • LXXIII Roman Numerals
      • LXXIV Roman Numerals
      • LXXV Roman Numerals
      • LXXVI Roman Numerals
      • LXXVII Roman Numerals
      • LXXVIII Roman Numerals
      • LXXIX Roman Numerals
      • LXXX Roman Numerals
      • LXXXI Roman Numerals
      • LXXXII Roman Numerals
      • LXXXIII Roman Numerals
      • LXXXIV Roman Numerals
      • LXXXV Roman Numerals
      • LXXXVI Roman Numerals
      • LXXXVII Roman Numerals
      • LXXXVIII Roman Numerals
      • LXXXIX Roman Numerals
      • XC Roman Numerals
      • XCI Roman Numerals
      • XCII Roman Numerals
      • XCIII Roman Numerals
      • XCIV Roman Numerals
      • XCV Roman Numerals
      • XCVI Roman Numerals
      • XCVII Roman Numerals
      • XCVIII Roman Numerals
      • XCIX Roman Numerals
      • C Roman Numerals
      • CI Roman Numerals
      • CII Roman Numerals
      • CIII Roman Numerals
      • CIV Roman Numerals
      • CV Roman Numerals
      • CVI Roman Numerals
      • CVII Roman Numerals
      • CVIII Roman Numerals
      • CIX Roman Numerals
      • CX Roman Numerals
      • CXI Roman Numerals
      • CXII Roman Numerals
      • CXIII Roman Numerals
      • CXIV Roman Numerals
      • CXV Roman Numerals
      • CXVI Roman Numerals
      • CXVII Roman Numerals
      • CXVIII Roman Numerals
      • CXIX Roman Numerals
      • CXX Roman Numerals
      • CXXI Roman Numerals
      • CXXII Roman Numerals
      • CXXIII Roman Numerals
      • CXXIV Roman Numerals
      • CXXV Roman Numerals
      • CXXVI Roman Numerals
      • CXXVII Roman Numerals
      • CXXVIII Roman Numerals
      • CXXIX Roman Numerals
      • CXXX Roman Numerals
      • CXXXI Roman Numerals
      • CXXXII Roman Numerals
      • CXXXIII Roman Numerals
      • CXXXIV Roman Numerals
      • CXXXV Roman Numerals
      • CXXXVI Roman Numerals
      • CXXXVII Roman Numerals
      • CXXXVIII Roman Numerals
      • CXXXIX Roman Numerals
      • CXL Roman Numerals
      • CXLI Roman Numerals
      • CXLII Roman Numerals
      • CXLIII Roman Numerals
      • CXLIV Roman Numerals
      • CXLV Roman Numerals
      • CXLVI Roman Numerals
      • CXLVII Roman Numerals
      • CXLVIII Roman Numerals
      • CXLIX Roman Numerals
      • CL Roman Numerals
      • CLI Roman Numerals
      • CLII Roman Numerals
      • CLIII Roman Numerals
      • CLIV Roman Numerals
      • CLV Roman Numerals
      • CLVI Roman Numerals
      • CLVII Roman Numerals
      • CLVIII Roman Numerals
      • CLIX Roman Numerals
      • CLX Roman Numerals
      • CLXI Roman Numerals
      • CLXII Roman Numerals
      • CLXIII Roman Numerals
      • CLXIV Roman Numerals
      • CLXV Roman Numerals
      • CLXVI Roman Numerals
      • CLXVII Roman Numerals
      • CLXVIII Roman Numerals
      • CLXIX Roman Numerals
      • CLXX Roman Numerals
      • CLXXI Roman Numerals
      • CLXXII Roman Numerals
      • CLXXIII Roman Numerals
      • CLXXIV Roman Numerals
      • CLXXV Roman Numerals
      • CLXXVI Roman Numerals
      • CLXXVII Roman Numerals
      • CLXXVIII Roman Numerals
      • CLXXIX Roman Numerals
      • CLXXX Roman Numerals
      • CLXXXI Roman Numerals
      • CLXXXII Roman Numerals
      • CLXXXIII Roman Numerals
      • CLXXXIV Roman Numerals
      • CLXXXV Roman Numerals
      • CLXXXVI Roman Numerals
      • CLXXXVII Roman Numerals
      • CLXXXVIII Roman Numerals
      • CLXXXIX Roman Numerals
      • CXC Roman Numerals
      • CXCI Roman Numerals
      • CXCII Roman Numerals
      • CXCIII Roman Numerals
      • CXCIV Roman Numerals
      • CXCV Roman Numerals
      • CXCVI Roman Numerals
      • CXCVII Roman Numerals
      • CXCVIII Roman Numerals
      • CXCIX in Roman Numerals
      • CC Roman Numerals
      • 3 in Roman Numerals
      • 4 in Roman Numerals
      • 5 in Roman Numerals
      • 6 in Roman Numerals
      • 7 in Roman Numerals
      • 8 in Roman Numerals
      • 9 in Roman Numerals
      • 10 in Roman Numerals
      • 11 in Roman Numerals
      • 12 in Roman Numerals
      • 13 in Roman Numerals
      • 14 in Roman Numerals
      • 15 in Roman Numerals
      • 16 in Roman Numerals
      • 18 in Roman Numerals
      • 19 in Roman Numerals
      • 20 in Roman Numerals
      • 22 in Roman Numerals
      • 30 in Roman Numerals
      • 50 in Roman Numerals
      • 100 in Roman Numerals
      • 500 in Roman Numerals
      • 1000 in Roman Numerals
      • SAMPLE >
        • TEMP XVII Roman Numerals
    • Percentage Increase Calculator
    • Linear Equations >
      • Two-Variable Linear Equations Test with Answers
      • One Variable Linear Equations >
        • Ax=B Linear Equation Calculator
        • Ax=B Linear Equation Practice Test
    • Decimal Places Value Chart
    • Cone Volume Calculator
    • Circumference Calculator
    • Rounding Calculator >
      • Round 15 to the nearest ten
      • Round 75 to the nearest ten
      • Round 35 to the nearest ten
      • Round 5 to the nearest ten
      • Round 3 to the Nearest Ten
    • Factor Calculator >
      • Factor of 36
      • Factor of 30
      • Factor of 32
      • Factor of 35
      • Factor of 39
      • Factor of 33
      • Factor of 34
      • Factor of 3
      • Factor of 3/4
      • Factor of 38
    • Radius of a Circle
    • Fraction Calculator
    • Perfect Square Calculator >
      • Is 1 a perfect square
      • Is 2 a perfect square
      • Is 8 a perfect square
      • Is 9 a perfect square
      • Is 16 a perfect square
      • Is 20 a perfect square
      • Is 36 a perfect square
      • Is 49 a perfect square
      • Is 81 a perfect square
      • Is 125 a perfect square
    • Random Number Generator >
      • Random and Pseudorandom Numbers
      • What is Random Number
    • Horizontal Line
    • X and Y Axis
    • Margin Calculator
    • Simple Interest Calculator
    • Sig Fig Calculator
    • Right Triangle Calculator
    • Money Counter
    • Root Calculator
    • Table of Square Roots
    • Square Root Calculator >
      • Square root of 2
      • Square root of 8
      • Square root of 5
      • Square root of 4
      • Square root of 3
      • Square root of 64
      • Square root of 10
      • Square root of 16
      • Square root of 25
      • Square root of 12
      • Square root of 50
      • Square root of 20
      • Square root of 9
      • Square root of 100
      • Square root of 36
      • Square root of 6
      • Square root of 49
      • Square root of 1
      • Square root of 32
      • Square root of 40
      • Square root of 81
      • Square root of 18
      • Square root of 72
      • Square root of 13
      • Square root of 80
      • Square root of 45
    • Log Calculator
    • Inequality Symbols
    • Exponent calculator
    • Decimal to Fraction Calculator
    • Fraction to Percent Calculator
    • Scale Factor
  • Unit Conversion
    • Celsius to Fahrenheit Converter >
      • -40 C to F
      • 10 C to F
      • 15 C to F
      • 22 C to F
      • 30 C to F
      • 37 C to F
      • 40 C to F
    • Fahrenheit to Celsius Converter >
      • -40 F to C
      • 17 Fahrenheit to Celsius
      • 18 Fahrenheit to Celsius
      • 19 Fahrenheit to Celsius
      • 20 Fahrenheit to Celsius
      • 23 Fahrenheit to Celsius
      • 26 Fahrenheit to Celsius
      • 27 Fahrenheit to Celsius
      • 28 Fahrenheit to Celsius
      • 37 Fahrenheit to Celsius
      • 40 F to C
      • 60 F to C
      • 68 F to C
      • 69 F to C
      • 70 F to C
      • 72 F to C
      • 75 F to C
      • 80 F to C
      • 90 F to C
      • 100 F to C
      • 180 F to C
      • 220 F to C
      • 350 F to C
    • Weight conversion table kg to lbs
    • Kilograms to Pounds Converter >
      • 1 kg to lbs
      • 2 kg to lbs
      • 3 kg to lbs
      • 4 kg to lbs
      • 6 kg to lbs
      • 8 kg to lbs
      • 10 kg to lbs
      • 12 kg to lbs
      • 15 kg to lbs
      • 16 kg to lbs
      • 20 kg to lbs
      • 23 kg to lbs
      • 25 kg to lbs
      • 30 kg to lbs
      • 40 kg to lbs
      • 45 kg to lbs
      • 50 kg to lbs
      • 53 kg to lbs
      • 56 kg to lbs
      • 57 kg to lbs
      • 58 kg to lbs
      • 59 kg to lbs
      • 60 kg to lb
      • 62 kg to lbs
      • 63 kg to lbs
      • 64 kg to lbs
      • 65 kg to lbs
      • 67 kg to lbs
      • 68 kg to lbs
      • 70 kg to lbs
      • 72 kg to lbs
      • 73 kg to lbs
      • 74 kg to lbs
      • 75 kg to lbs
      • 76 kg to lbs
      • 78 kg to lbs
      • 80 kg to lbs
      • 82 kg to lbs
      • 84 kg to lbs
      • 85 kg to lbs
      • 90 kg to lbs
      • 95 kg to lbs
      • 150 kg to lbs
      • 100 kg to lbs
    • Pounds to Kilograms Converter >
      • 1-10 LB to KG >
        • 1.25 lb to kg
        • 2.25 lb to kg
        • 3.75 lb to kg
        • 1.75 lb to kg
        • 1.56 lb to kg
        • 5.25 lb to kg
        • 2.75 lb to kg
        • 1.87 lb to kg
        • 1.65 lb to kg
        • 2.87 lb to kg
        • 0.75 lb to kg
        • 0.75 lb to kg
        • 1.1 lb to kg
        • 1.21 lb to kg
        • 1.32 lb to kg
        • 3.25 lb to kg
        • 1.55 lb to kg
        • 2.65 lb to kg
        • 1.37 lb to kg
        • 0.55 lb to kg
        • 1.85 lb to kg
        • 2.15 lb to kg
        • 1.14 lb to kg
        • 3.31 lb to kg
        • 0.88 lb to kg
        • 1.15 lb to kg
        • 5.29 lb to kg
        • 0.45 lb to kg
        • 4.75 lb to kg
        • 0.85 lb to kg
        • 0.95 lb to kg
        • 5.11 lb to kg
        • 0.44 lb to kg
        • 1.82 lb to kg
        • 2.85 lb to kg
        • 0.68 lb to kg
        • 1.13 lb to kg
        • 0.05 lb to kg
        • 2.47 lb to kg
        • 3.85 lb to kg
        • 4.23 lb to kg
        • 1.38 lb to kg
        • 2.91 lb to kg
        • 4.12 lb to kg
        • 2.95 lb to kg
        • 5.73 lb to kg
        • 2.99 lb to kg
        • 1.78 lb to kg
        • 3.35 lb to kg
        • 1.92 lb to kg
        • 1.58 lb to kg
        • 5.51 lb to kg
        • 1.28 lb to kg
        • 0.02 lb to kg
        • 1.42 lb to kg
        • 0.89 lb to kg
        • 1.16 lb to kg
        • 1.99 lb to kg
        • 1.69 lb to kg
        • 2.17 lb to kg
        • 1 lb to kg
        • 1.6 lb to kg
        • 2 lb to kg
        • 3 lb to kg
        • 4 lb to kg
        • 5 lb to kg
        • 6 lb to kg
        • 7 lb to kg
        • 8 lb to kg
        • 9 lb to kg
        • 10 lb to kg
      • 11 lb to kg
      • 12 lb to kg
      • 12.5 lb to kg
      • 13 lb to kg
      • 14 lb to kg
      • 15 lb to kg
      • 16 lb to kg
      • 17 lb to kg
      • 18 lb to kg
      • 19 lb to kg
      • 20 lb to kg
      • 21 lb to kg
      • 22 lb to kg
      • 23 lb to kg
      • 24 lb to kg
      • 25 lb to kg
      • 26 lb to kg
      • 27 lb to kg
      • 28 lb to kg
      • 29 lb to kg
      • 30 lb to kg
      • 31 lb to kg
      • 32 lb to kg
      • 33 lb to kg
      • 35 lb to kg
      • 40 lb to kg
      • 45 lb to kg
      • 50 lb to kg
      • 55 lb to kg
      • 60 lb to kg
      • 70 lb to kg
      • 90 lb to kg
      • 98 lb to kg
      • 99 lb to kg
      • 100 lb to kg
      • 130 lb to kg
      • 150 lb to kg
    • Fluid Ounces to Milliliters
    • Kilometers to Miles Converter >
      • 1 kilometer to miles
      • 5 km to miles
      • 10 km to miles
      • 15 km to miles
      • 20 km to miles
      • 50 km to miles
      • 100 km to miles
    • Miles to Kilometers Conversion >
      • 1 mile to kilometers
      • 5 miles to km
      • 10 miles to km
      • 15 miles to km
      • 20 miles to km
    • KPH to MPH Converter >
      • 30 kph to mph
      • 45 kph to mph
      • 60 kph to mph
      • 70 kph to mph
      • 75 kph to mph
      • 90 kph to mph
      • 100 kph to mph
      • 110 kph to mph
      • 120 kph to mph
      • 130 kph to mph
      • 140 kph to mph
      • 150 kph to mph
      • 155 kph to mph
      • 160 kph to mph
      • 165 kph to mph
      • 180 kph to mph
      • 200 kph to mph
      • 210 kph to mph
      • 220 kph to mph
      • 240 kph to mph
      • 250 kph to mph
      • 260 kph to mph
      • 270 kph to mph
      • 280 kph to mph
      • 300 kph to mph
      • 320 kph to mph
      • 360 kph to mph
      • 400 kph to mph
      • 600 kph to mph
      • 800 kph to mph
    • Inches to Millimeters Converter >
      • 1 inch to mm
      • 1.5 inches to mm
      • 2 inches to mm
      • 2.5 inches to mm
      • 3 inches to mm
      • 4 inches to mm
      • 5 inches to mm
      • 6 inches to mm
      • 18 inches to mm
      • 34 inches to mm
      • 160 inches to mm
    • Millimeters to Inches Converter >
      • 1 mm to inches
      • 1.5 mm to inches
      • 2 mm to inches
      • 2.5 mm to inches
      • 3 mm to inches
      • 3.5 mm to inches
      • 4 mm to inches
      • 4.5 mm to inches
      • 5 mm to inches
      • 6 mm to inches
      • 8 mm to inches
      • 10 mm to inches
    • Meters to Feet Converter >
      • 1 Meter to Feet
      • 2 Meters to Feet
      • 3 Meters to Feet
      • 5 Meters to Feet
      • 10 Meters to Feet
      • 20 Meters to Feet
      • 30 Meters to Feet
      • 50 Meters to Feet
      • 100 Meters to Feet
    • Centimeters to Inches Converter >
      • 2 cm to inches
      • 3 cm to inches
      • 5 cm to inches
      • 8 cm to inches
      • 10 cm to inches
      • 12 cm to inches
      • 14 cm to inches
      • 15 cm to inches
      • 17 cm to inches
      • 18 cm to inches
      • 20 cm to inches
      • 21 cm to inches
      • 25 cm to inches
      • 28 cm to inches
      • 30 cm to inches
      • 35 cm to inches
      • 40 cm to inches
      • 50 cm to inches
      • 60 cm to inches
      • 36 cm to inches
      • 45 cm to inches
      • 70 cm to inches
      • 80 cm to inches
      • 90 cm to inches
      • 100 cm to inches
      • 120 cm to inches
      • 150 cm to inches
    • Centimeters to Feet Converter >
      • 150 cm to feet
      • 160 cm to feet
      • 162 cm to feet
      • 163 cm to feet
      • 164 cm to feet
      • 165 cm to feet
      • 170 cm to feet
      • 172 cm to feet
      • 173 cm to feet
      • 175 cm to feet
      • 178 cm to feet
      • 180 cm to feet
      • 182 cm to feet
      • 183 cm to feet
      • 185 cm to feet
      • 190 cm to feet
    • Watts to Amps Calculator >
      • 500 Watts to Amps
      • 800 Watts to Amps
      • 1000 Watts to Amps
      • 1200 Watts to Amps
      • 1500 Watts to Amps
      • 2500 Watts to Amps
      • 3000 Watts to Amps
      • 5000 Watts to Amps
    • MCG to MG Converter >
      • 5 mcg to mg
      • 10 mcg to mg
      • 50 mcg to mg
      • 100 mcg to mg
      • 125 mcg to mg
      • 200 mcg to mg
      • 250 mcg to mg
      • 300 mcg to mg
      • 400 mcg to mg
      • 500 mcg to mg
      • 1000 mcg to mg
  • Date & Time
    • Time Duration Calculator
    • Time Conversion Chart
    • Military Times Chart
    • Military Time Now Clock
    • Military Time Converter
    • GMT Time Clock
    • Time Zone
    • Age Calculator
  • Test Prep
    • CFA Exam Overview >
      • How to Prepare for CFA level 1: An Actionable Study Guide
      • 20 CFA Level 1 Practice Questions
      • CFA Practice Questions for level 1
      • 30 CFA Level 1 Practice Questions
      • CFA Level 2 Practice Exam Questions
      • CFA Sample Practice Questions | Level 3| Answers and Explanations
      • CFA Exam Requirements
      • CFA Level 3 Salary
    • SAT Practice Test Math
    • Math Practice Test HiSET
    • Acing the SAT: A Comprehensive and Actionable Study Guide
    • GMAT Practice Questions Math with Answers and Explanations
    • GMAT Math Formulas Sheet
    • Math Practice Test for GED with Answers and Explanations
    • Math Problems to Solve | Practice Test
    • Free Practice TEAS Test
    • ​GRE Practice Math Questions | Free | Answers & Explanations
    • Formulas for GRE Math Section
    • ACT Practice Test with Answers and Explanations
    • CPA Practice Questions
    • ASVAB Practice Test
    • IQ Test
    • How many hours to study for CPA
    • How to Excel in Your CPA Exams: A Comprehensive Preparation Guide
  • Blog
  • Contact Us
    • Advertise Here
    • Privacy Policy
    • Useful Calculators and Converters
  • Español
    • XVIII Roman Numerals
    • XIX Roman Numerals
    • XX Roman Numerals
    • XXI Roman Numerals
    • XVIII Roman Numerals
    • XXII Roman Numerals
    • XXIII Roman Numerals
    • XXIV Roman Numerals
    • XXV Roman Numerals
    • XXVI Roman Numerals
    • XXVII Roman Numerals
    • XXVIII Roman Numerals
    • XXIX Roman Numerals
    • XXX Roman Numerals
    • XXXI Roman Numerals
    • XXXII Roman Numerals
    • XXXIII Roman Numerals
    • XXXIV Roman Numerals
    • XXXV Roman Numerals
    • XXXVI Roman Numerals
    • XXXVII Roman Numerals
    • XXXVIII Roman Numerals
    • XXXIX Roman Numerals
    • XL Roman Numerals
    • XLI Roman Numerals
    • XLII Roman Numerals
    • XLIII Roman Numerals
    • XLIV Roman Numerals
    • XLV Roman Numerals
    • XLVI Roman Numerals
    • XLVII Roman Numerals
    • XLVIII Roman Numerals
    • XLIX Roman Numerals
    • L Roman Numerals
    • LI Roman Numerals
    • LII Roman Numerals
    • LIII Roman Numerals
    • LIV Roman Numerals
    • LV Roman Numerals
    • LVI Roman Numerals
    • LVII Roman Numerals
    • LVIII Roman Numerals
    • LIX Roman Numerals
    • LX Roman Numerals
    • LXI Roman Numerals
    • LXII Roman Numerals
    • LXIII Roman Numerals
    • LXIV Roman Numerals
    • LXV Roman Numerals
    • XVIII Roman Numerals
    • TEMP XVII Roman Numerals
    • XVIII Roman Numerals >
      • TEMP XVII Roman Numerals
  • Mole Calculator
  • BMI Calculator
  • Tic Tac Toe
  • 100s Chart -Printable
  • Online Timer
  • Online Stopwatch
  • How Many Days Until Chritmas
  • ​Simple Interest Formula Explained
  • Understanding Simple Interest vs. Compound Interest
  • 10 Real-World Simple Interest Examples
  • 20 Simple Interest Problems
  • Compound Interest Practice Problems
  • 34 lb to kg
  • 36 lb to kg
  • 37 lb to kg
  • 38 lb to kg
  • 39 lb to kg
  • 41 lb to kg
  • 42 lb to kg
  • 43 lb to kg
  • 44 lb to kg
  • 46 lb to kg
  • 47 lb to kg
  • 48 lb to kg
  • 49 lb to kg
  • 51 lb to kg
  • 52 lb to kg
  • 53 lb to kg
  • 54 lb to kg
  • 56 lb to kg
  • 57 lb to kg
  • 58 lb to kg
  • 59 lb to kg
  • 61 lb to kg
  • 62 lb to kg
  • 63 lb to kg
  • 64 lb to kg
  • 65 lb to kg